
Immune Sequence

You may have noticed this Immune sequence pop up online recently.
It was originally created in 2009 by BKS Iyengar in response to the Swine Flu pandemic.
There’s a morning sequence and afternoon sequence - made up of mostly forward bends and inversions.
Below is some info and instructions to help with your home practice.
The Morning Sequence
The longer morning sequence is made up of just 9 key poses, plus variations in shoulder stand if you’re working with those. Each pose should be held for 3 - 5 minutes each, but the longer you can remain in the supported poses the better!
Here’s a quick overview of the actions and some options for each pose:
Uttanasana - standing forward bend:
Stand with the feet hip-width apart, keeping your legs straight and bend forward at the waist to let the spine and crown of the head release to the floor. Hold onto opposite elbows or your heels. Continue to draw the front of the legs up and descend the heels down. If this is strong on the lower back or hamstrings, slightly bend the knees or take your hands to the wall and do Ardha Uttansana (half forward bend) with a flat back.
Ardho Mukha Svanasana - downward dog:
Have your hands and feet hip width apart and lift the hips up to create a V-shape with the body. Spread the hands and fingers wide and push the floor away to lengthen up and back through the spine. Press your heels towards the floor and your upper thighs back behind you, to bring more weight into the legs. A belt around the elbows can help support and stabilise the arms. If this is strong on the hamstrings, bend the knees but keep the spine long.
Prasarita Paddotanasana - wide legged forward bend:
Take the legs out wide, toes pointing forward and outside edges of the feet parallel lines. Draw up the front of the legs like in Uttanasana and bend forward at the hips. Bring the hands to the floor directly under the shoulders and create a flat back - belly in. Walk the hands back in line with the feet and release the spine and crown of the head down to the floor. If this is too strong for the back, slightly bend the knees or stay with a flat back.
Sirsasana - headstand:
From a kneeling position, place your forearms and elbows on the floor, shoulder width apart and interlace your fingers together. Place the crown of the head on the floor, between wrists. Press the forearms and wrists down, lift the knees and buttocks up and walk the feet in towards you. Keep the forearms and wrists pressing down into the floor, and take one leg up at a time. Take the legs and feet to a wall if you are not freestanding yet.
Dwi Pada Viparita Dandasana - chair backbend:
Sit through the back of the chair, with the feet on the floor. Lay your back on the seat so your buttocks hang off, and then slowly slide back through until the upper back and head start to curl over the front edge of the chair. Keep the feet planted, knees tracking in line with the hips and the tailbone long. Keep holding the back rung or take the arms underneath the chair to curl through more, broaden and open the upper chest.
Salamba Sarvangasana - supported shoulder stand:
Always use blankets under your shoulders to support the neck. In the final pose, the elbows and upper arms are strongly pressing down and the hands are supporting the upper back (not the waist or lower back). You should be right on the shoulder tips - not on the upper back and the tailbone and legs are lengthening and lifting up to the ceiling. Press your thighs back to stop your legs from falling forward over your face.
Halasana - plow pose:
From shoulder stand, bring your legs over your head, placing the feet to the floor. Keep the elbows pressing on the floor and hands supporting the upper back in the same way. Lift and press the hips, buttock and thighs strongly up and away from the face. Keep the legs strong and straight. You can also take the feet onto some height or to a wall if you can’t reach the floor or if this pose feels heavy in the throat and neck.
Viparita Karani - legs up the wall:
Have a three fold blanket or a bolster near the wall. Come and sit side-on with the left hip against the wall. Swing the legs along the wall to the left, so that the buttocks are both on the blanket near the wall. Lengthen the spine straight back along the floor and take the arms out away from the body. Keep the legs straight or use a belt around the calves to hold them. If this is strong on the hamstrings, shuffle the buttocks away from the wall.
Savasana - corpse pose:
Use a three fold blanket under your head and neck, and lay down flat on the floor. Bring the shoulder blades down and towards each other to lift and open the chest. Let the arms rest on the floor away from the torso, palms facing up. Lengthen the tailbone towards the heels, by bending the knees and bringing the feet to the floor, then straighten the legs and let the feet fall out to either side. Close your eyes and rest.


Morning Sequence - Without The Inversions
For beginners or anyone who doesn’t practice inversions and those who can not practice inversions (due to menstruation, an injury or health condition) - I suggest replacing these with a nice long Setu Bandha Sarvangasa, which is also included in the Evening practice (see below). This more restorative pose will still provide similar benefits to headstand, chair backbend and shoulder stand.
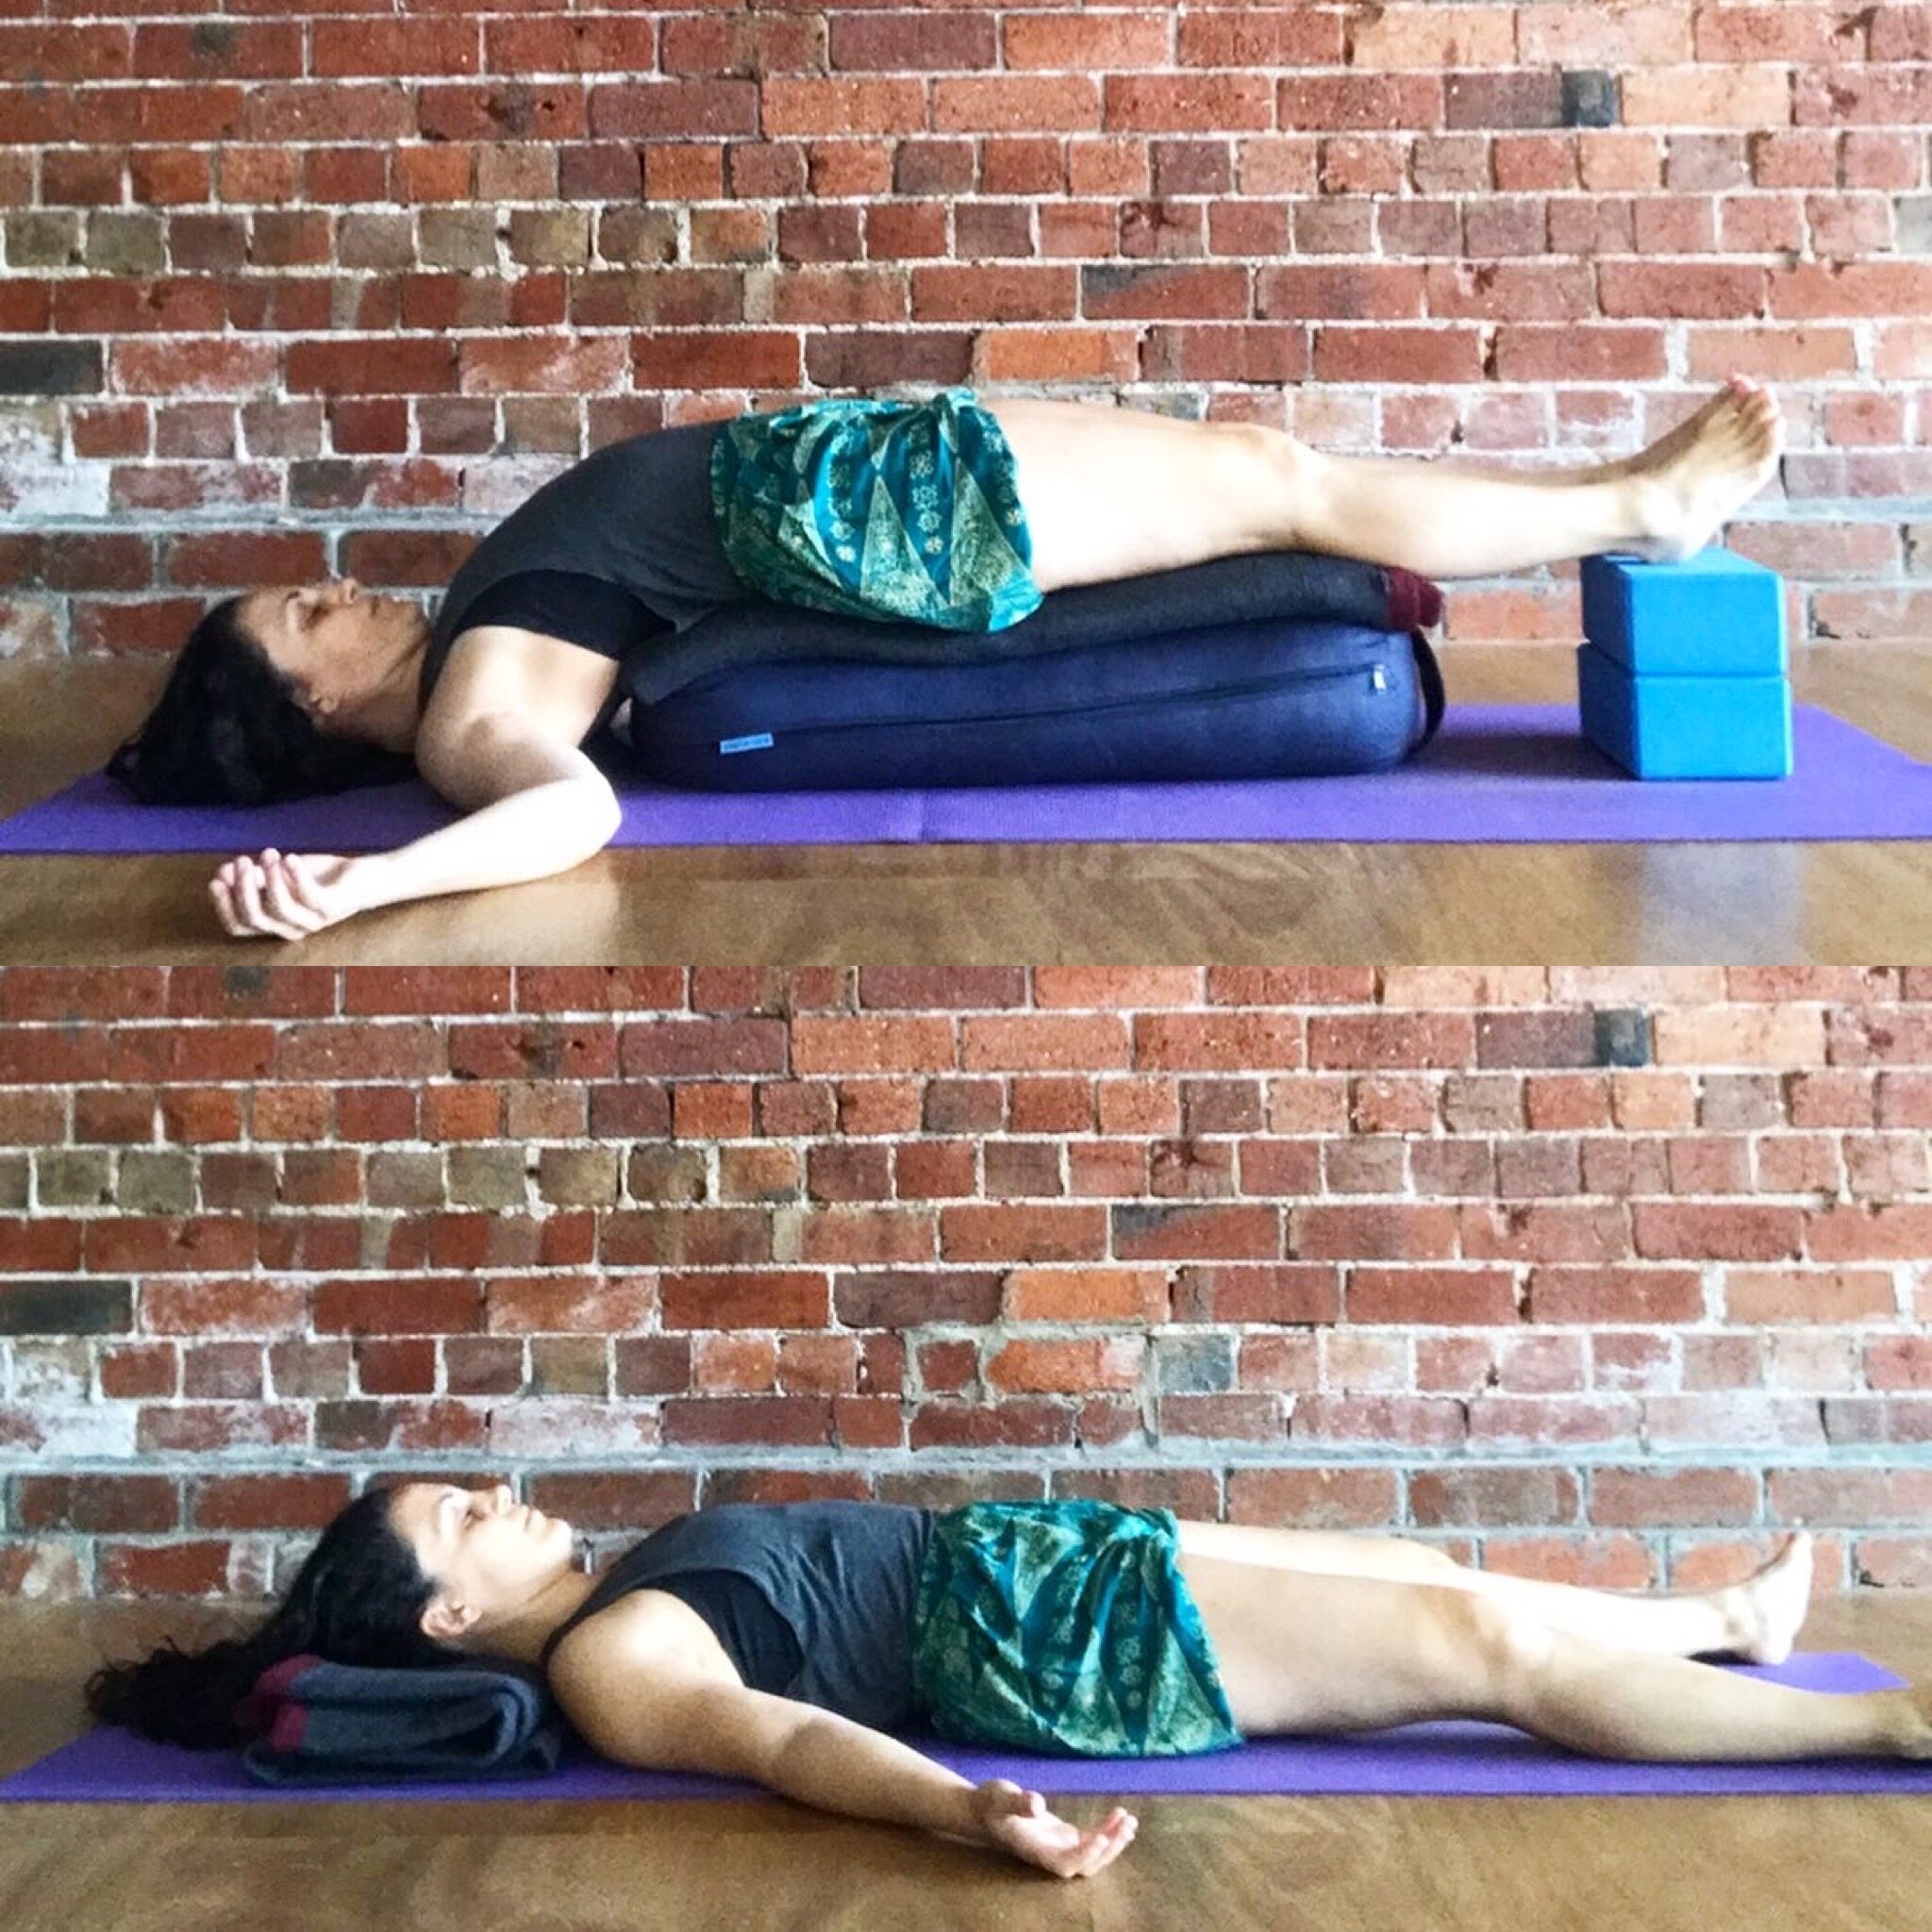
Setu Bandha Sarvangasa (supported bridge pose):
Most of your will have practiced this pose with a block under the tailbone, and you can certainly do this version if you’d prefer - as long as it’s comfortable and supportive enough to remain for 5 -10 minutes. Alternatively, you can use a bolster, blankets or even towels folded length-ways as you can see in the photo below.
Neatly, fold and set up your props, Lay the whole back down on them. Have your feet pressing on the floor and slowly slide along untile the shoulder tips start to slide off and down to the floor (like the chair backbend above). Once the shoulders are down, lift and lengthen the head and neck along the floor. Straighten the legs and take them onto support, so they’re as high as the hips. Let the arms open out to either side, elbows slightly bent and the palms facing up. You can also belt the legs together for added support.


The Evening Sequence
The evening sequence is made up of just 5 key poses - inversions with longer timings followed by Setu Bandha Sarvangasana and Savasana.
If you’re not inverting and feeling energetic you can repeat the morning sequence, but if you’re feeling tired or overwhelmed, you can simply practice those two poses with long timings and a focus on your breath,

Full Evening Sequence - 45 min
Sirsasana - 10 min
Salamba Sarvangasan - 10 min
Halasana 5 min
Setu Bandha Sarvangasana - 10 min
Savasana - 10 min
Mini Evening Sequence - 25 min
Setu Bandha Sarvangasana - supported bridge 10 - 15 min
Savasana - corpse pose 10min
Email me at hello@ohmyyoga.com.au if you have questions about any of these poses or would like to arrange an online session via Zoom.